源码:https://download.csdn.net/download/qq_43753724/20031203?spm=1001.2014.3001.5501
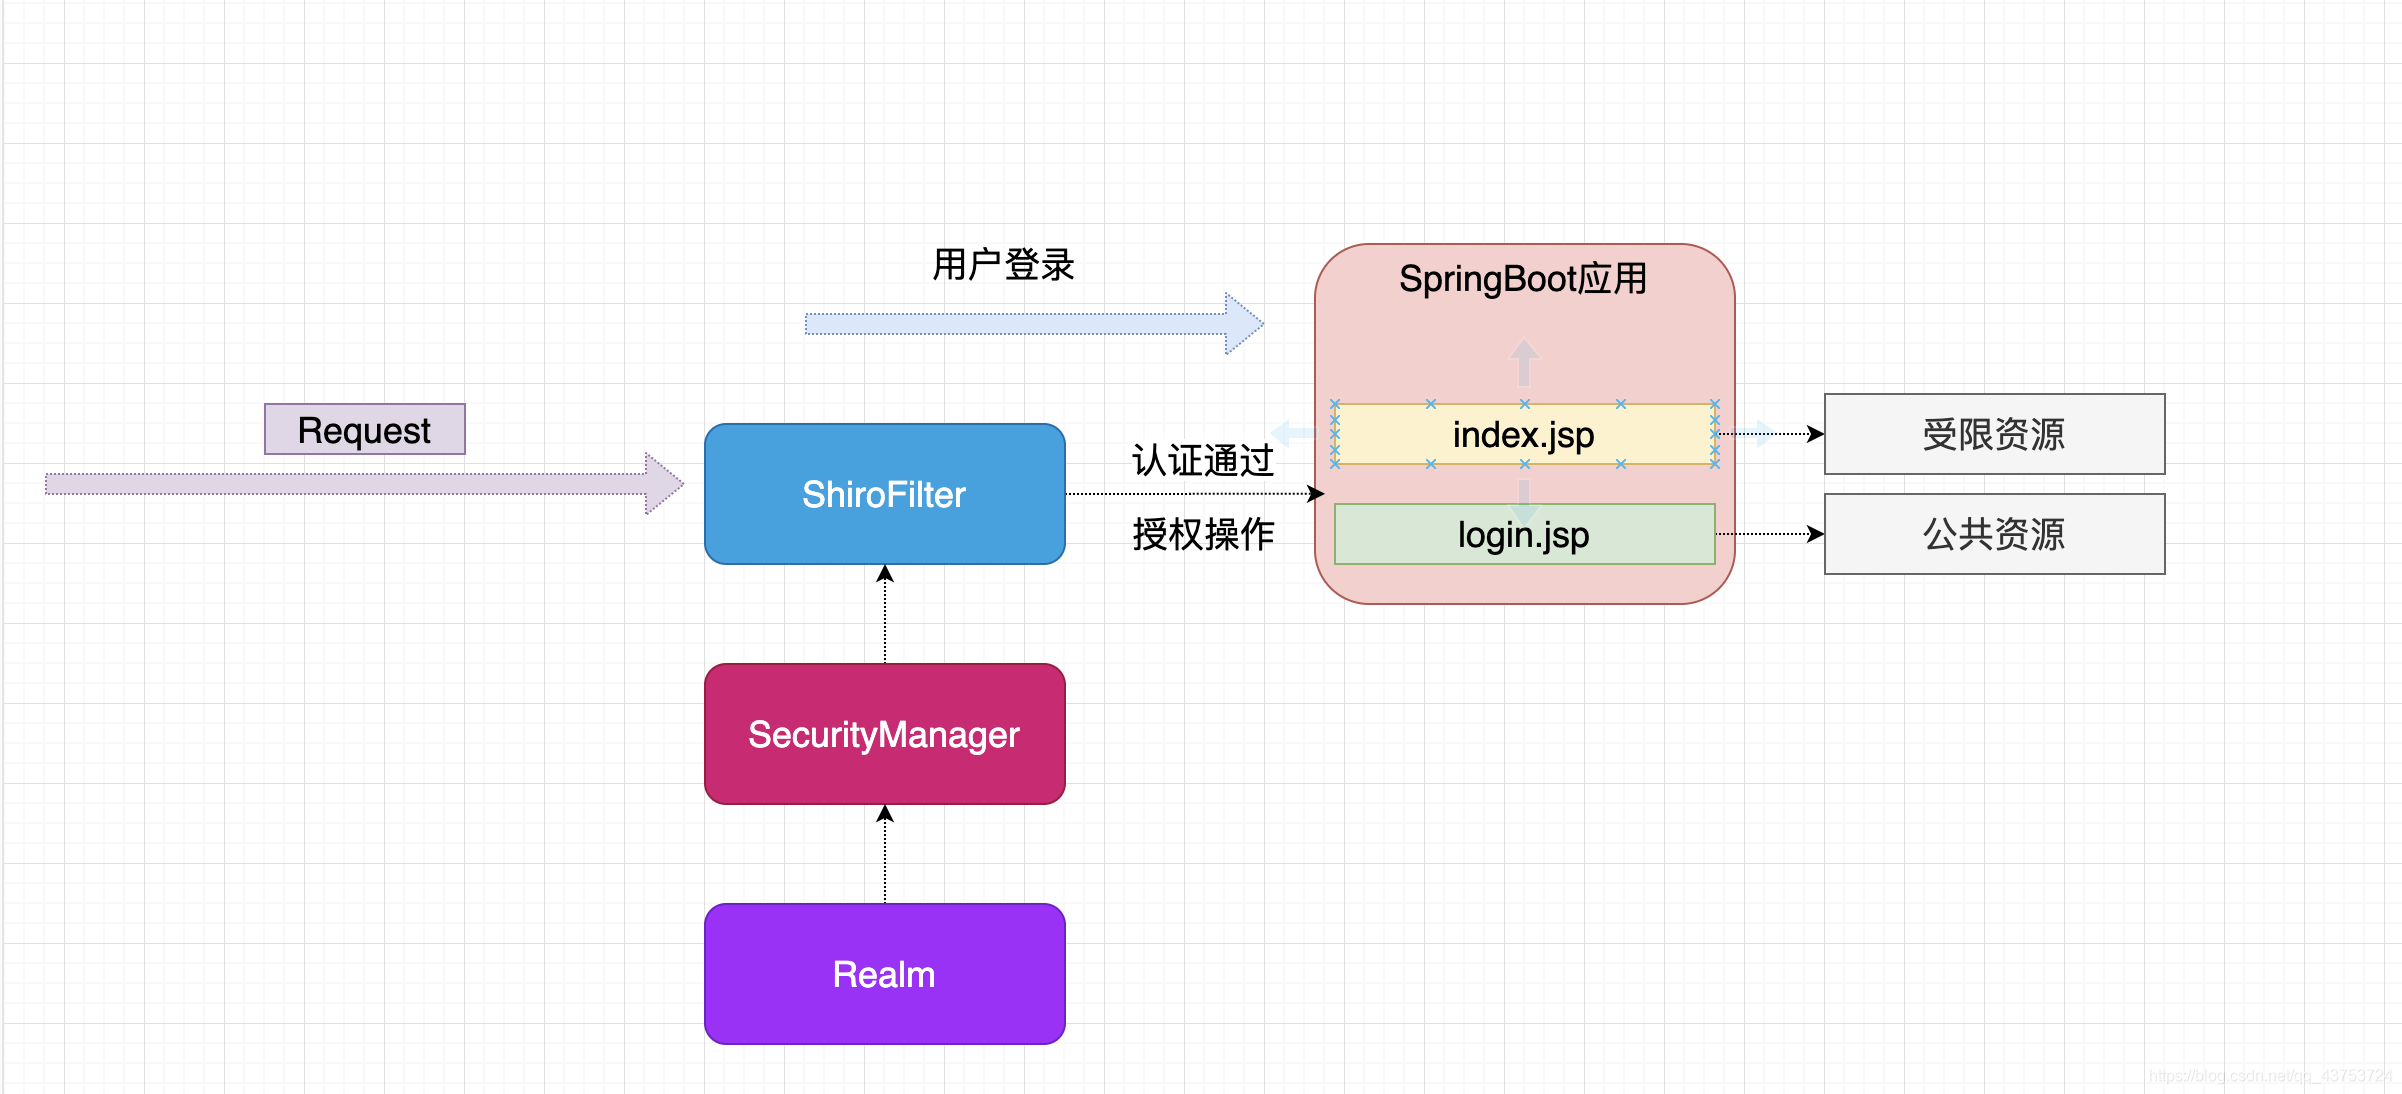

<dependency>
  <groupId>org.apache.shiro</groupId>
  <artifactId>shiro-spring-boot-starter</artifactId>
  <version>1.5.3</version>
</dependency>
@Bean
public ShiroFilterFactoryBean getShiroFilterFactoryBean(SecurityManager securityManager){
  //创建shiro的filter
  ShiroFilterFactoryBean shiroFilterFactoryBean = new ShiroFilterFactoryBean();
  //注入安全管理器
  shiroFilterFactoryBean.setSecurityManager(securityManager);

  return shiroFilterFactoryBean;
}@Bean
public DefaultWebSecurityManager getSecurityManager(Realm realm){
DefaultWebSecurityManager defaultWebSecurityManager = new DefaultWebSecurityManager();
defaultWebSecurityManager.setRealm(realm);
return defaultWebSecurityManager;
}
public class CustomerRealm extends AuthorizingRealm {
    //处理授权
    @Override
    protected AuthorizationInfo doGetAuthorizationInfo(PrincipalCollection principals) {
        return null;
    }
		//处理认证
    @Override
    protected AuthenticationInfo doGetAuthenticationInfo(AuthenticationToken token) throws
      																																		AuthenticationException {
        return null;
    }
}//创建自定义realm
@Bean
public Realm getRealm(){
return new CustomerRealm();
}@Controller
public class IndexController {
@RequestMapping("index")
public String index(){
System.out.println("跳转至主页");
return "index";
}
}


修改ShiroFilterFactoryBean配置
//注入安全管理器
shiroFilterFactoryBean.setSecurityManager(securityManager);
Map<String,String> map =  new LinkedHashMap<>();
map.put("/**","authc");
//配置认证和授权规则
shiroFilterFactoryBean.setFilterChainDefinitionMap(map);[外链图片转存失败,源站可能有防盗链机制,建议将图片保存下来直接上传(img-932Hxa4K-1625454917389)(Shiro 实战教程.assets/image-20200523102303320.png)]

配置缩写 | 对应的过滤器 | 功能 |
|---|---|---|
anon | AnonymousFilter | 指定url可以匿名访问 |
authc | FormAuthenticationFilter | 指定url需要form表单登录,默认会从请求中获取username、password,rememberMe等参数并尝试登录,如果登录不了就会跳转到loginUrl配置的路径。我们也可以用这个过滤器做默认的登录逻辑,但是一般都是我们自己在控制器写登录逻辑的,自己写的话出错返回的信息都可以定制嘛。 |
authcBasic | BasicHttpAuthenticationFilter | 指定url需要basic登录 |
logout | LogoutFilter | 登出过滤器,配置指定url就可以实现退出功能,非常方便 |
noSessionCreation | NoSessionCreationFilter | 禁止创建会话 |
perms | PermissionsAuthorizationFilter | 需要指定权限才能访问 |
port | PortFilter | 需要指定端口才能访问 |
rest | HttpMethodPermissionFilter | 将http请求方法转化成相应的动词来构造一个权限字符串,这个感觉意义不大,有兴趣自己看源码的注释 |
roles | RolesAuthorizationFilter | 需要指定角色才能访问 |
ssl | SslFilter | 需要https请求才能访问 |
user | UserFilter | 需要已登录或“记住我”的用户才能访问 |

<form action="${pageContext.request.contextPath}/user/login" method="post">
  用户名:<input type="text" name="username" > <br/>
  密码  : <input type="text" name="password"> <br>
  <input type="submit" value="登录">
</form>@Controller
@RequestMapping("user")
public class UserController {
/**
* 用来处理身份认证
* @param username
* @param password
* @return
*/
@RequestMapping("login")
public String login(String username,String password){
//获取主体对象
Subject subject = SecurityUtils.getSubject();
try {
subject.login(new UsernamePasswordToken(username,password));
return "redirect:/index.jsp";
} catch (UnknownAccountException e) {
e.printStackTrace();
System.out.println("用户名错误!");
}catch (IncorrectCredentialsException e){
e.printStackTrace();
System.out.println("密码错误!");
}
return "redirect:/login.jsp";
}
}@Override
protected AuthenticationInfo doGetAuthenticationInfo(AuthenticationToken token) throws AuthenticationException {
System.out.println("==========================");
String principal = (String) token.getPrincipal();
if("xiaochen".equals(principal)){
return new SimpleAuthenticationInfo(principal,"123",this.getName());
}
return null;
}
}


@Controller
@RequestMapping("user")
public class UserController {
  /**
    * 退出登录
    *
    */
  @RequestMapping("logout")
  public String logout(){
    Subject subject = SecurityUtils.getSubject();
    subject.logout();//退出用户
    return "redirect:/login.jsp";
  }
}

<h1>用户注册</h1>
<form action="${pageContext.request.contextPath}/user/register" method="post">
  用户名:<input type="text" name="username" > <br/>
  密码  : <input type="text" name="password"> <br>
  <input type="submit" value="立即注册">
</form>
SET NAMES utf8mb4;
SET FOREIGN_KEY_CHECKS = 0;
-- ----------------------------
-- Table structure for t_user
-- ----------------------------
DROP TABLE IF EXISTS `t_user`;
CREATE TABLE `t_user` (
  `id` int(6) NOT NULL AUTO_INCREMENT,
  `username` varchar(40) DEFAULT NULL,
  `password` varchar(40) DEFAULT NULL,
  `salt` varchar(255) DEFAULT NULL,
  PRIMARY KEY (`id`)
) ENGINE=InnoDB AUTO_INCREMENT=2 DEFAULT CHARSET=utf8;

SET FOREIGN_KEY_CHECKS = 1;
<!--mybatis相关依赖-->
<dependency>
  <groupId>org.mybatis.spring.boot</groupId>
  <artifactId>mybatis-spring-boot-starter</artifactId>
  <version>2.1.2</version>
</dependency>

<!--mysql-->
<dependency>
  <groupId>mysql</groupId>
  <artifactId>mysql-connector-java</artifactId>
  <version>5.1.38</version>
</dependency>


<!--druid-->
<dependency>
  <groupId>com.alibaba</groupId>
  <artifactId>druid</artifactId>
  <version>1.1.19</version>
</dependency>server.port=8888
server.servlet.context-path=/shiro
spring.application.name=shiro
spring.mvc.view.suffix=/
spring.mvc.view.prefix=.jsp
#数据源
spring.datasource.type=com.alibaba.druid.pool.DruidDataSource
spring.datasource.driver-class-name=com.mysql.cj.jdbc.Driver
spring.datasource.url=jdbc:mysql://localhost:3306/shiro?characterEncoding=UTF-8
spring.datasource.username=root
spring.datasource.password=123456
mybatis.type-aliases-package=com.baizhi.springboot_jsp_shiro.entity
mybatis.mapper-locations=classpath:com/baizhi/mapper/*.xml
#redis
spring.redis.database=0
spring.redis.host=192.168.159.22
spring.redis.port=6379
#logging.level.root=debug
logging.level.com.baizhi.springboot_jsp_shiro.dao=debug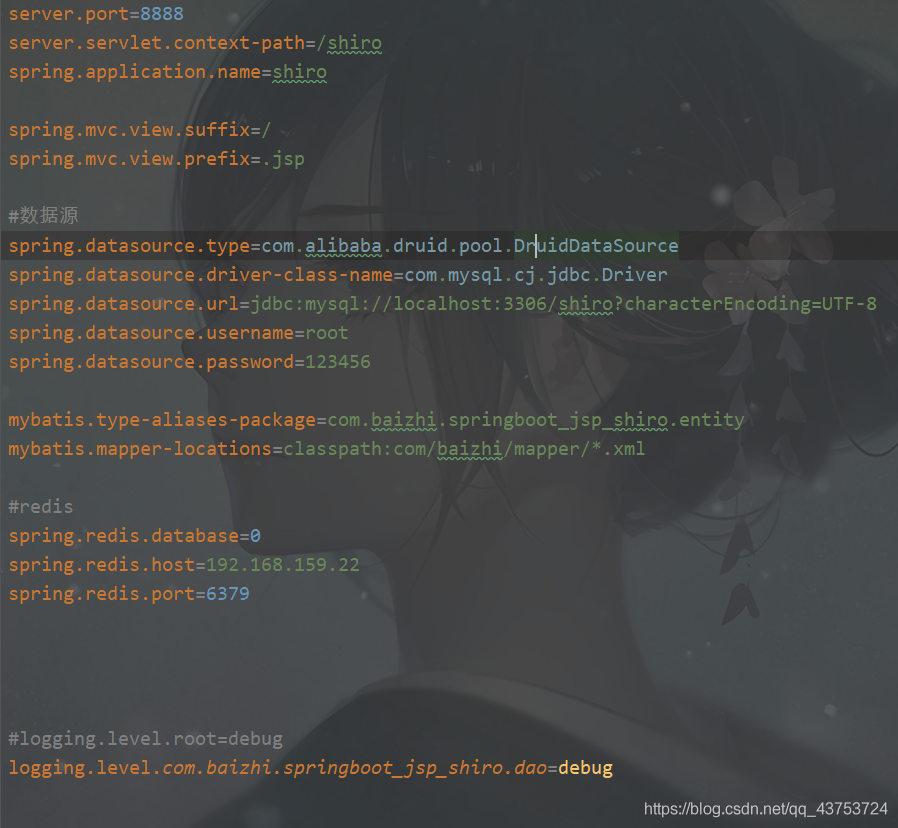
@Data
@Accessors(chain = true)
@AllArgsConstructor
@NoArgsConstructor
public class User {
    private String  id;
    private String username;
    private String password;
    private String salt;
}@Mapper
public interface UserDAO {
void save(User user);
}<insert id="save" parameterType="User" useGeneratedKeys="true" keyProperty="id">
insert into t_user values(#{id},#{username},#{password},#{salt})
</insert>public interface UserService {
//注册用户方法
void register(User user);
}public class SaltUtils {
/**
* 生成salt的静态方法
* @param n
* @return
*/
public static String getSalt(int n){
char[] chars = "ABCDEFGHIJKLMNOPQRSTUVWXYZabcdefghijklmnopqrstuvwxyz01234567890!@#$%^&*()".toCharArray();
StringBuilder sb = new StringBuilder();
for (int i = 0; i < n; i++) {
char aChar = chars[new Random().nextInt(chars.length)];
sb.append(aChar);
}
return sb.toString();
}
}@Service
@Transactional
public class UserServiceImpl implements UserService {
@Autowired
private UserDAO userDAO;
@Override
public void register(User user) {
//处理业务调用dao
//1.生成随机盐
String salt = SaltUtils.getSalt(8);
//2.将随机盐保存到数据
user.setSalt(salt);
//3.明文密码进行md5 + salt + hash散列
Md5Hash md5Hash = new Md5Hash(user.getPassword(),salt,1024);
user.setPassword(md5Hash.toHex());
userDAO.save(user);
}
}@Controller
@RequestMapping("user")
public class UserController {
@Autowired
private UserService userService;
/**
* 用户注册
*/
@RequestMapping("register")
public String register(User user) {
try {
userService.register(user);
return "redirect:/login.jsp";
}catch (Exception e){
e.printStackTrace();
return "redirect:/register.jsp";
}
}
}
@Mapper
public interface UserDAO {

    void save(User user);
		//根据身份信息认证的方法
    User findByUserName(String username);
}<select id="findByUserName" parameterType="String" resultType="User">
select id,username,password,salt from t_user
where username = #{username}
</select>public interface UserService {
//注册用户方法
void register(User user);
//根据用户名查询业务的方法
User findByUserName(String username);
}@Service("userService")
@Transactional
public class UserServiceImpl implements UserService {
@Autowired
private UserDAO userDAO;
@Override
public User findByUserName(String username) {
return userDAO.findByUserName(username);
}
}@Component
public class ApplicationContextUtils implements ApplicationContextAware {
private static ApplicationContext context;
@Override
public void setApplicationContext(ApplicationContext applicationContext) throws BeansException {
this.context = applicationContext;
}
//根据bean名字获取工厂中指定bean 对象
public static Object getBean(String beanName){
return context.getBean(beanName);
}
} @Override
protected AuthenticationInfo doGetAuthenticationInfo(AuthenticationToken token) throws AuthenticationException {
System.out.println("==========================");
//根据身份信息
String principal = (String) token.getPrincipal();
//在工厂中获取service对象
UserService userService = (UserService) ApplicationContextUtils.getBean("userService");
//根据身份信息查询
User user = userService.findByUserName(principal);
if(!ObjectUtils.isEmpty(user)){
//返回数据库信息
return new SimpleAuthenticationInfo(user.getUsername(),user.getPassword(),
ByteSource.Util.bytes(user.getSalt()),this.getName());
}
return null;
}@Bean
public Realm getRealm(){
CustomerRealm customerRealm = new CustomerRealm();
//设置hashed凭证匹配器
HashedCredentialsMatcher credentialsMatcher = new HashedCredentialsMatcher();
//设置md5加密
credentialsMatcher.setHashAlgorithmName("md5");
//设置散列次数
credentialsMatcher.setHashIterations(1024);
customerRealm.setCredentialsMatcher(credentialsMatcher);
return customerRealm;
}<%@taglib prefix="shiro" uri="http://shiro.apache.org/tags" %>
<shiro:hasAnyRoles name="user,admin">
<li><a href="">用户管理</a>
<ul>
<shiro:hasPermission name="user:add:*">
<li><a href="">添加</a></li>
</shiro:hasPermission>
<shiro:hasPermission name="user:delete:*">
<li><a href="">删除</a></li>
</shiro:hasPermission>
<shiro:hasPermission name="user:update:*">
<li><a href="">修改</a></li>
</shiro:hasPermission>
<shiro:hasPermission name="user:find:*">
<li><a href="">查询</a></li>
</shiro:hasPermission>
</ul>
</li>
</shiro:hasAnyRoles>
<shiro:hasRole name="admin">
<li><a href="">商品管理</a></li>
<li><a href="">订单管理</a></li>
<li><a href="">物流管理</a></li>
</shiro:hasRole>@RequestMapping("save")
public String save(){
System.out.println("进入方法");
//获取主体对象
Subject subject = SecurityUtils.getSubject();
//代码方式
if (subject.hasRole("admin")) {
System.out.println("保存订单!");
}else{
System.out.println("无权访问!");
}
//基于权限字符串
//....
return "redirect:/index.jsp";
}
@RequiresRoles(value={"admin","user"})//用来判断角色  同时具有 admin user
@RequiresPermissions("user:update:01") //用来判断权限字符串
@RequestMapping("save")
public String save(){
  System.out.println("进入方法");
  return "redirect:/index.jsp";
}
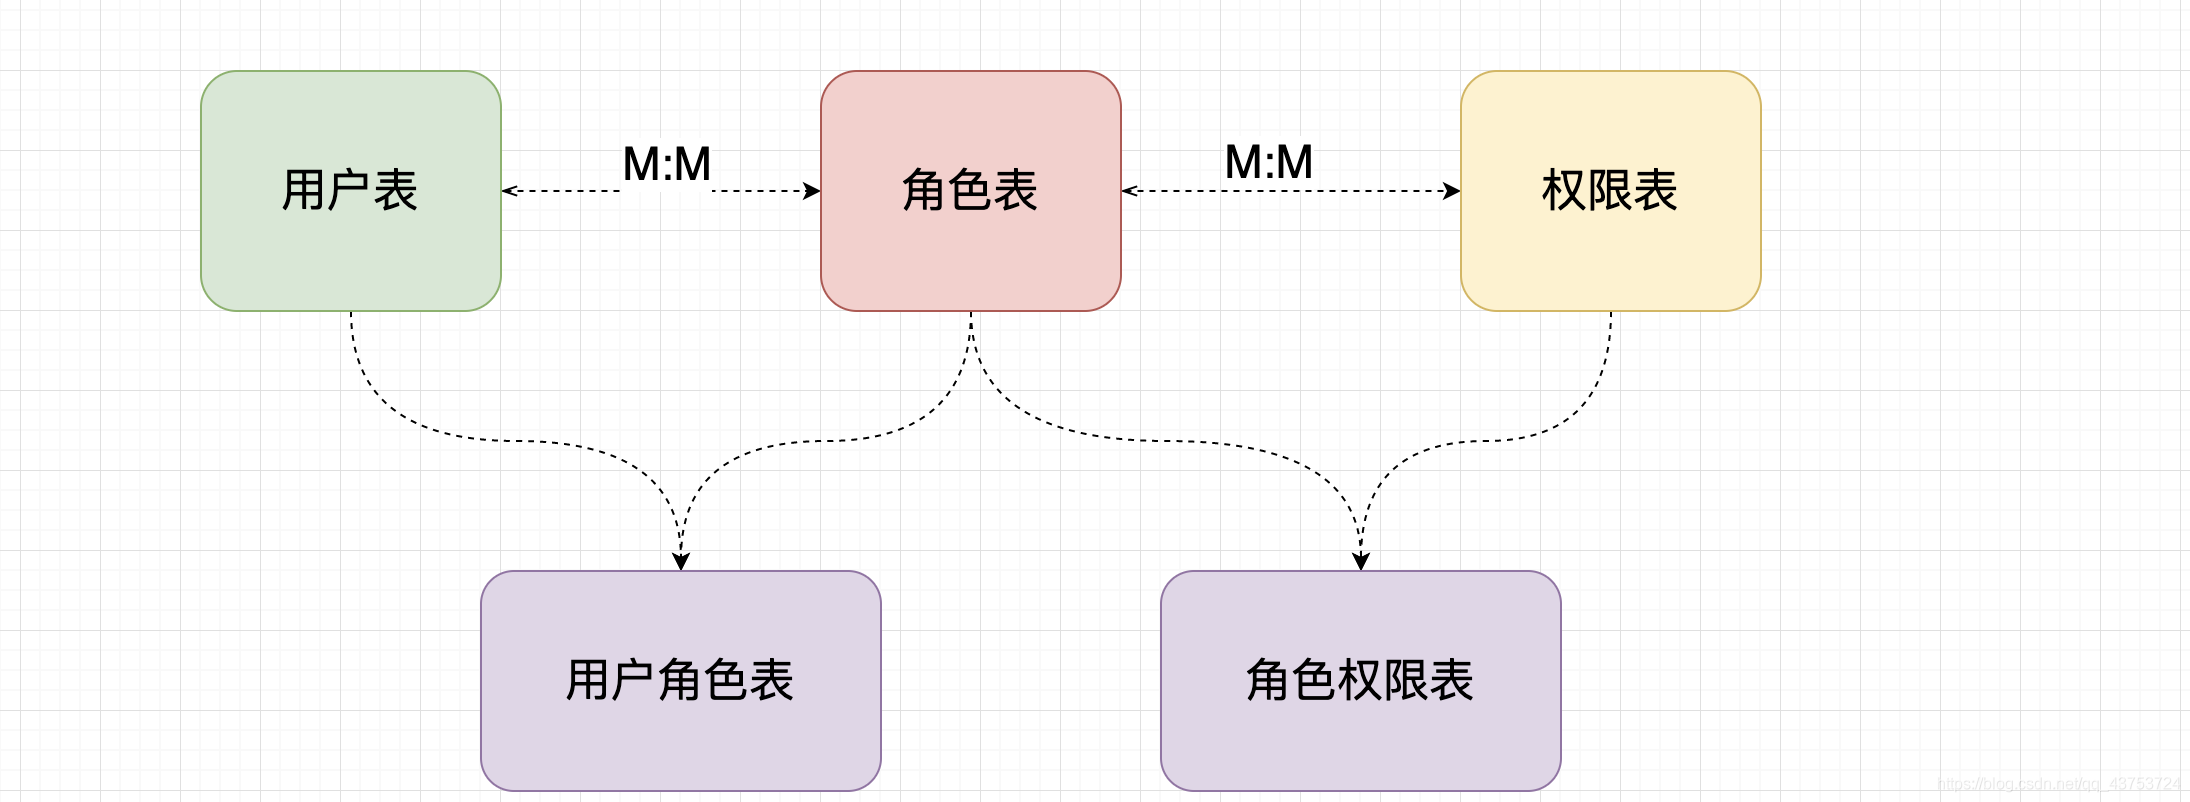
SET NAMES utf8mb4;
SET FOREIGN_KEY_CHECKS = 0;

-- ----------------------------
-- Table structure for t_pers
-- ----------------------------
DROP TABLE IF EXISTS `t_pers`;
CREATE TABLE `t_pers` (
  `id` int(6) NOT NULL AUTO_INCREMENT,
  `name` varchar(80) DEFAULT NULL,
  `url` varchar(255) DEFAULT NULL,
  PRIMARY KEY (`id`)
) ENGINE=InnoDB DEFAULT CHARSET=utf8;

-- ----------------------------
-- Table structure for t_role
-- ----------------------------
DROP TABLE IF EXISTS `t_role`;
CREATE TABLE `t_role` (
  `id` int(6) NOT NULL AUTO_INCREMENT,
  `name` varchar(60) DEFAULT NULL,
  PRIMARY KEY (`id`)
) ENGINE=InnoDB DEFAULT CHARSET=utf8;

-- ----------------------------
-- Table structure for t_role_perms
-- ----------------------------
DROP TABLE IF EXISTS `t_role_perms`;
CREATE TABLE `t_role_perms` (
  `id` int(6) NOT NULL,
  `roleid` int(6) DEFAULT NULL,
  `permsid` int(6) DEFAULT NULL,
  PRIMARY KEY (`id`)
) ENGINE=InnoDB DEFAULT CHARSET=utf8;

-- ----------------------------
-- Table structure for t_user
-- ----------------------------
DROP TABLE IF EXISTS `t_user`;
CREATE TABLE `t_user` (
  `id` int(6) NOT NULL AUTO_INCREMENT,
  `username` varchar(40) DEFAULT NULL,
  `password` varchar(40) DEFAULT NULL,
  `salt` varchar(255) DEFAULT NULL,
  PRIMARY KEY (`id`)
) ENGINE=InnoDB AUTO_INCREMENT=2 DEFAULT CHARSET=utf8;

-- ----------------------------
-- Table structure for t_user_role
-- ----------------------------
DROP TABLE IF EXISTS `t_user_role`;
CREATE TABLE `t_user_role` (
  `id` int(6) NOT NULL,
  `userid` int(6) DEFAULT NULL,
  `roleid` int(6) DEFAULT NULL,
  PRIMARY KEY (`id`)
) ENGINE=InnoDB DEFAULT CHARSET=utf8;

SET FOREIGN_KEY_CHECKS = 1; //根据用户名查询所有角色
User findRolesByUserName(String username);
//根据角色id查询权限集合
List<Perms> findPermsByRoleId(String id);<resultMap id="userMap" type="User">
<id column="uid" property="id"/>
<result column="username" property="username"/>
<!--角色信息-->
<collection property="roles" javaType="list" ofType="Role">
<id column="id" property="id"/>
<result column="rname" property="name"/>
</collection>
</resultMap>
<select id="findRolesByUserName" parameterType="String" resultMap="userMap">
SELECT u.id uid,u.username,r.id,r.NAME rname
FROM t_user u
LEFT JOIN t_user_role ur
ON u.id=ur.userid
LEFT JOIN t_role r
ON ur.roleid=r.id
WHERE u.username=#{username}
</select>
<select id="findPermsByRoleId" parameterType="String" resultType="Perms">
SELECT p.id,p.NAME,p.url,r.NAME
FROM t_role r
LEFT JOIN t_role_perms rp
ON r.id=rp.roleid
LEFT JOIN t_perms p ON rp.permsid=p.id
WHERE r.id=#{id}
</select>//根据用户名查询所有角色
User findRolesByUserName(String username);
//根据角色id查询权限集合
List<Perms> findPermsByRoleId(String id);@Override
public List<Perms> findPermsByRoleId(String id) {
return userDAO.findPermsByRoleId(id);
}
@Override
public User findRolesByUserName(String username) {
return userDAO.findRolesByUserName(username);
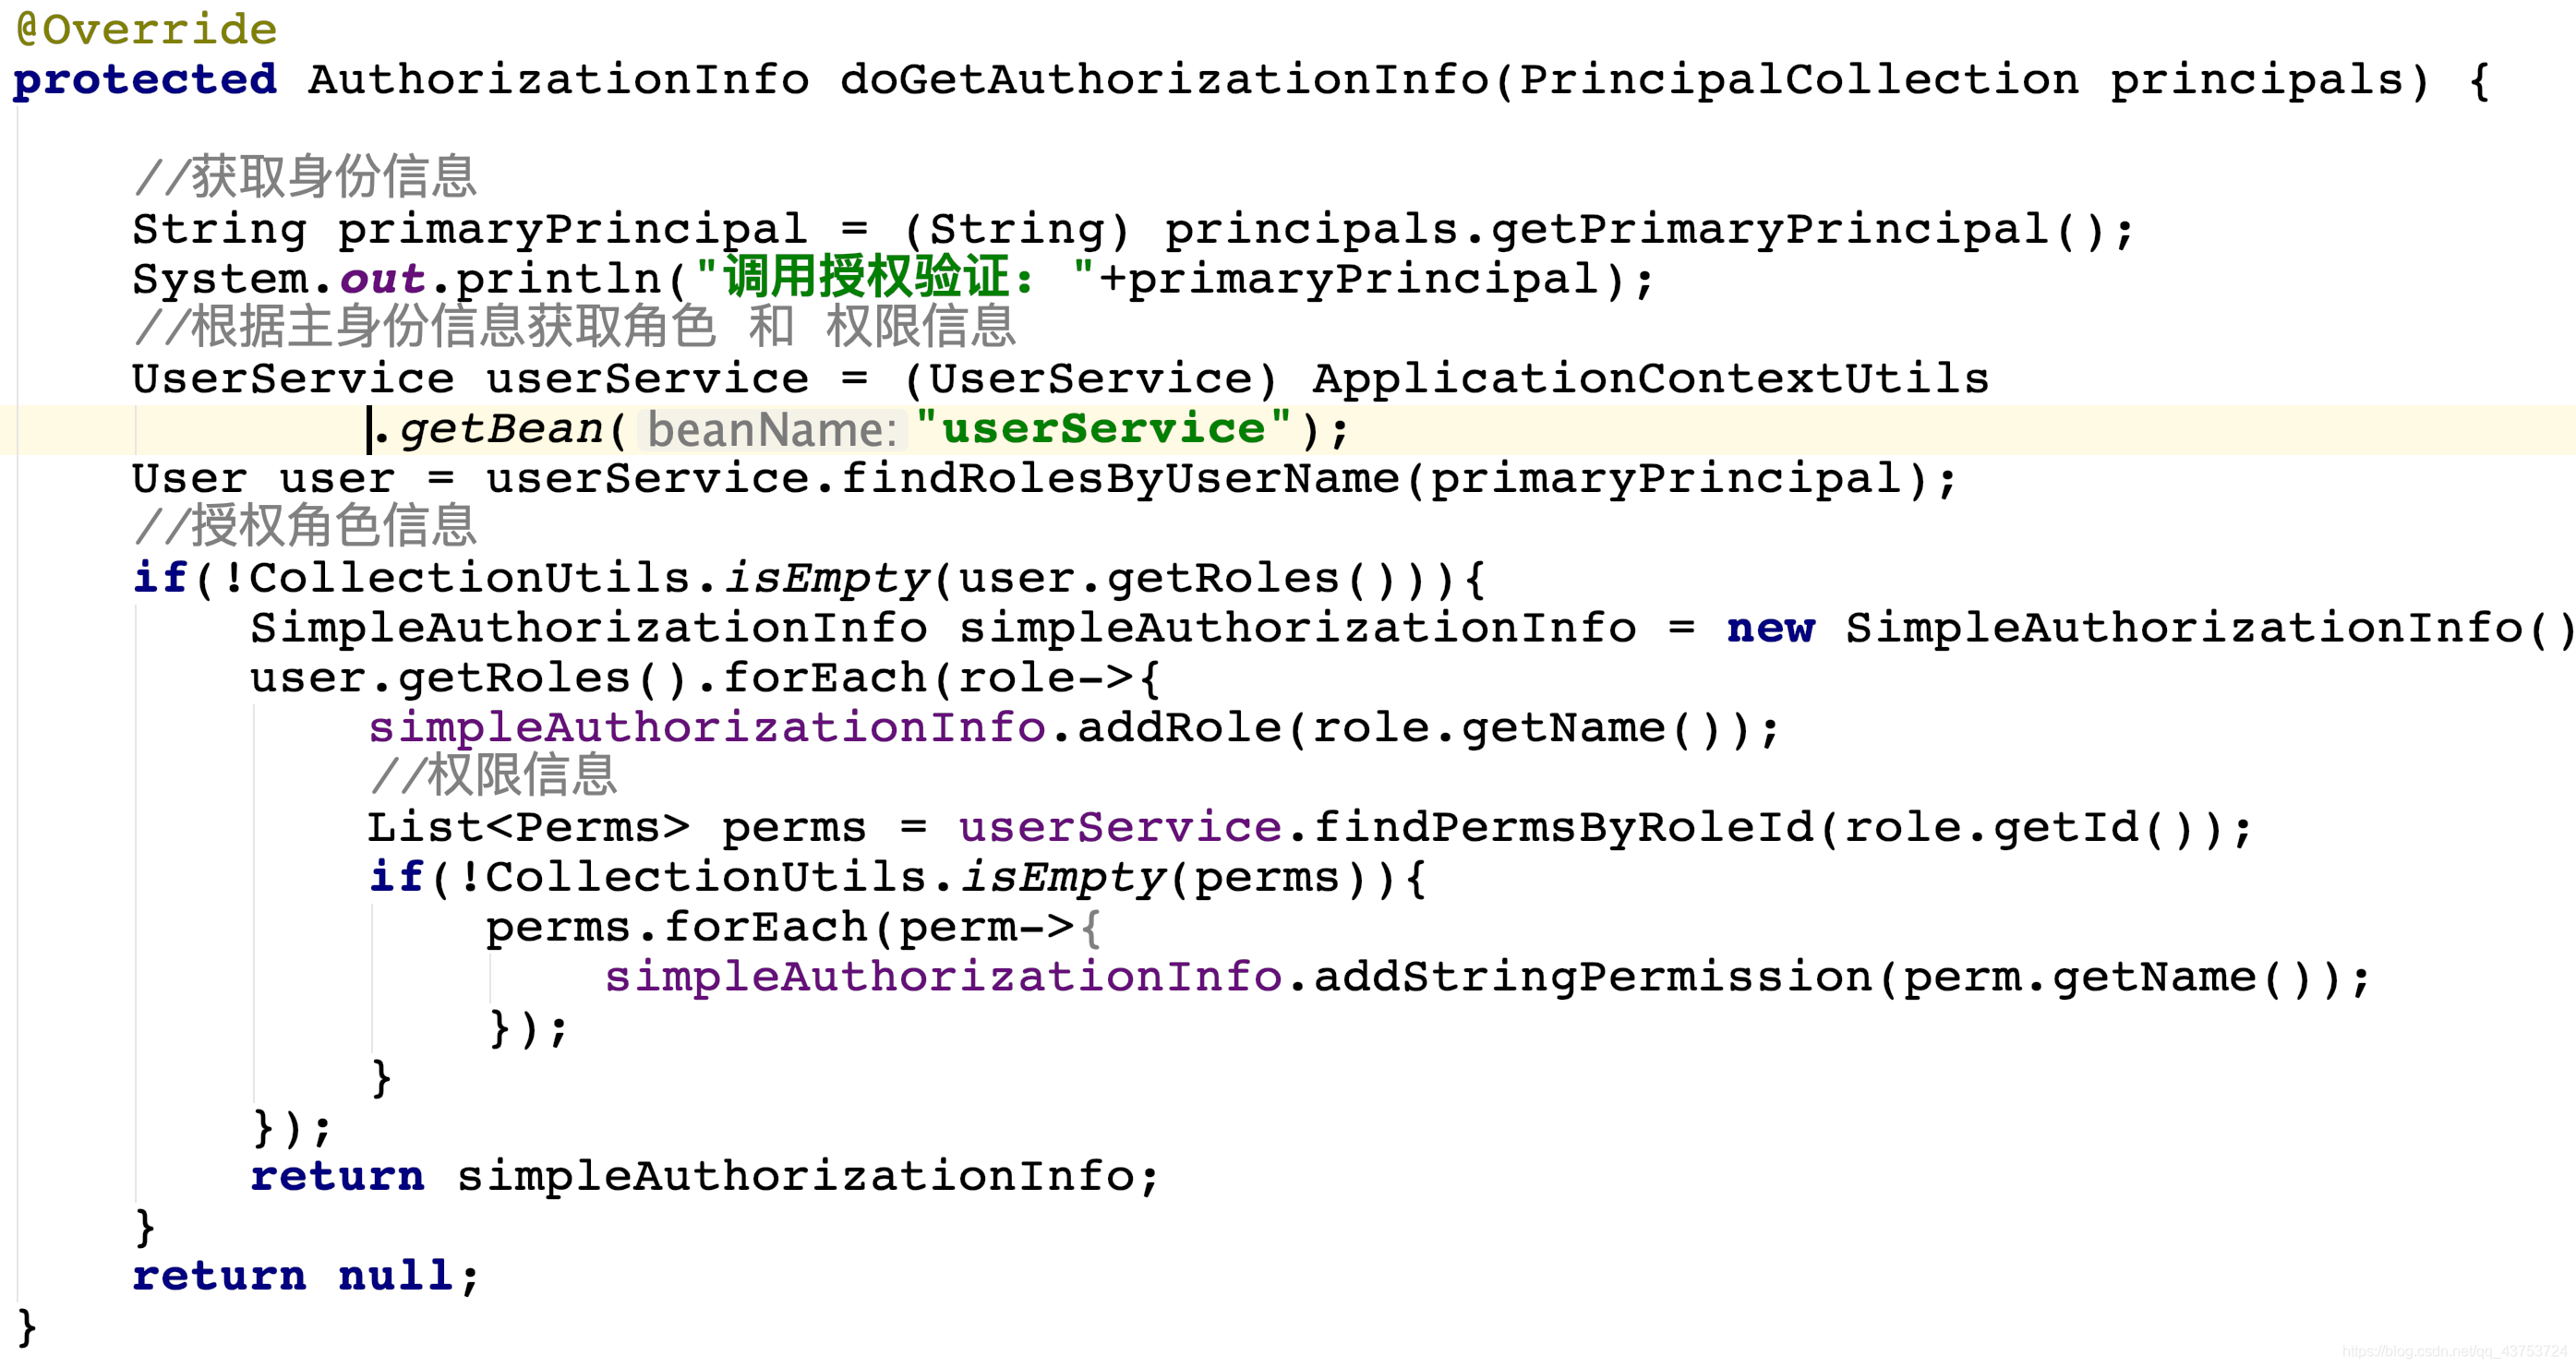
}public class CustomerRealm extends AuthorizingRealm {
@Override
protected AuthorizationInfo doGetAuthorizationInfo(PrincipalCollection principals) {
//获取身份信息
String primaryPrincipal = (String) principals.getPrimaryPrincipal();
System.out.println("调用授权验证: "+primaryPrincipal);
//根据主身份信息获取角色 和 权限信息
UserService userService = (UserService) ApplicationContextUtils.getBean("userService");
User user = userService.findRolesByUserName(primaryPrincipal);
//授权角色信息
if(!CollectionUtils.isEmpty(user.getRoles())){
SimpleAuthorizationInfo simpleAuthorizationInfo = new SimpleAuthorizationInfo();
user.getRoles().forEach(role->{
simpleAuthorizationInfo.addRole(role.getName());
//权限信息
List<Perms> perms = userService.findPermsByRoleId(role.getId());
if(!CollectionUtils.isEmpty(perms)){
perms.forEach(perm->{
simpleAuthorizationInfo.addStringPermission(perm.getName());
});
}
});
return simpleAuthorizationInfo;
}
return null;
}
}
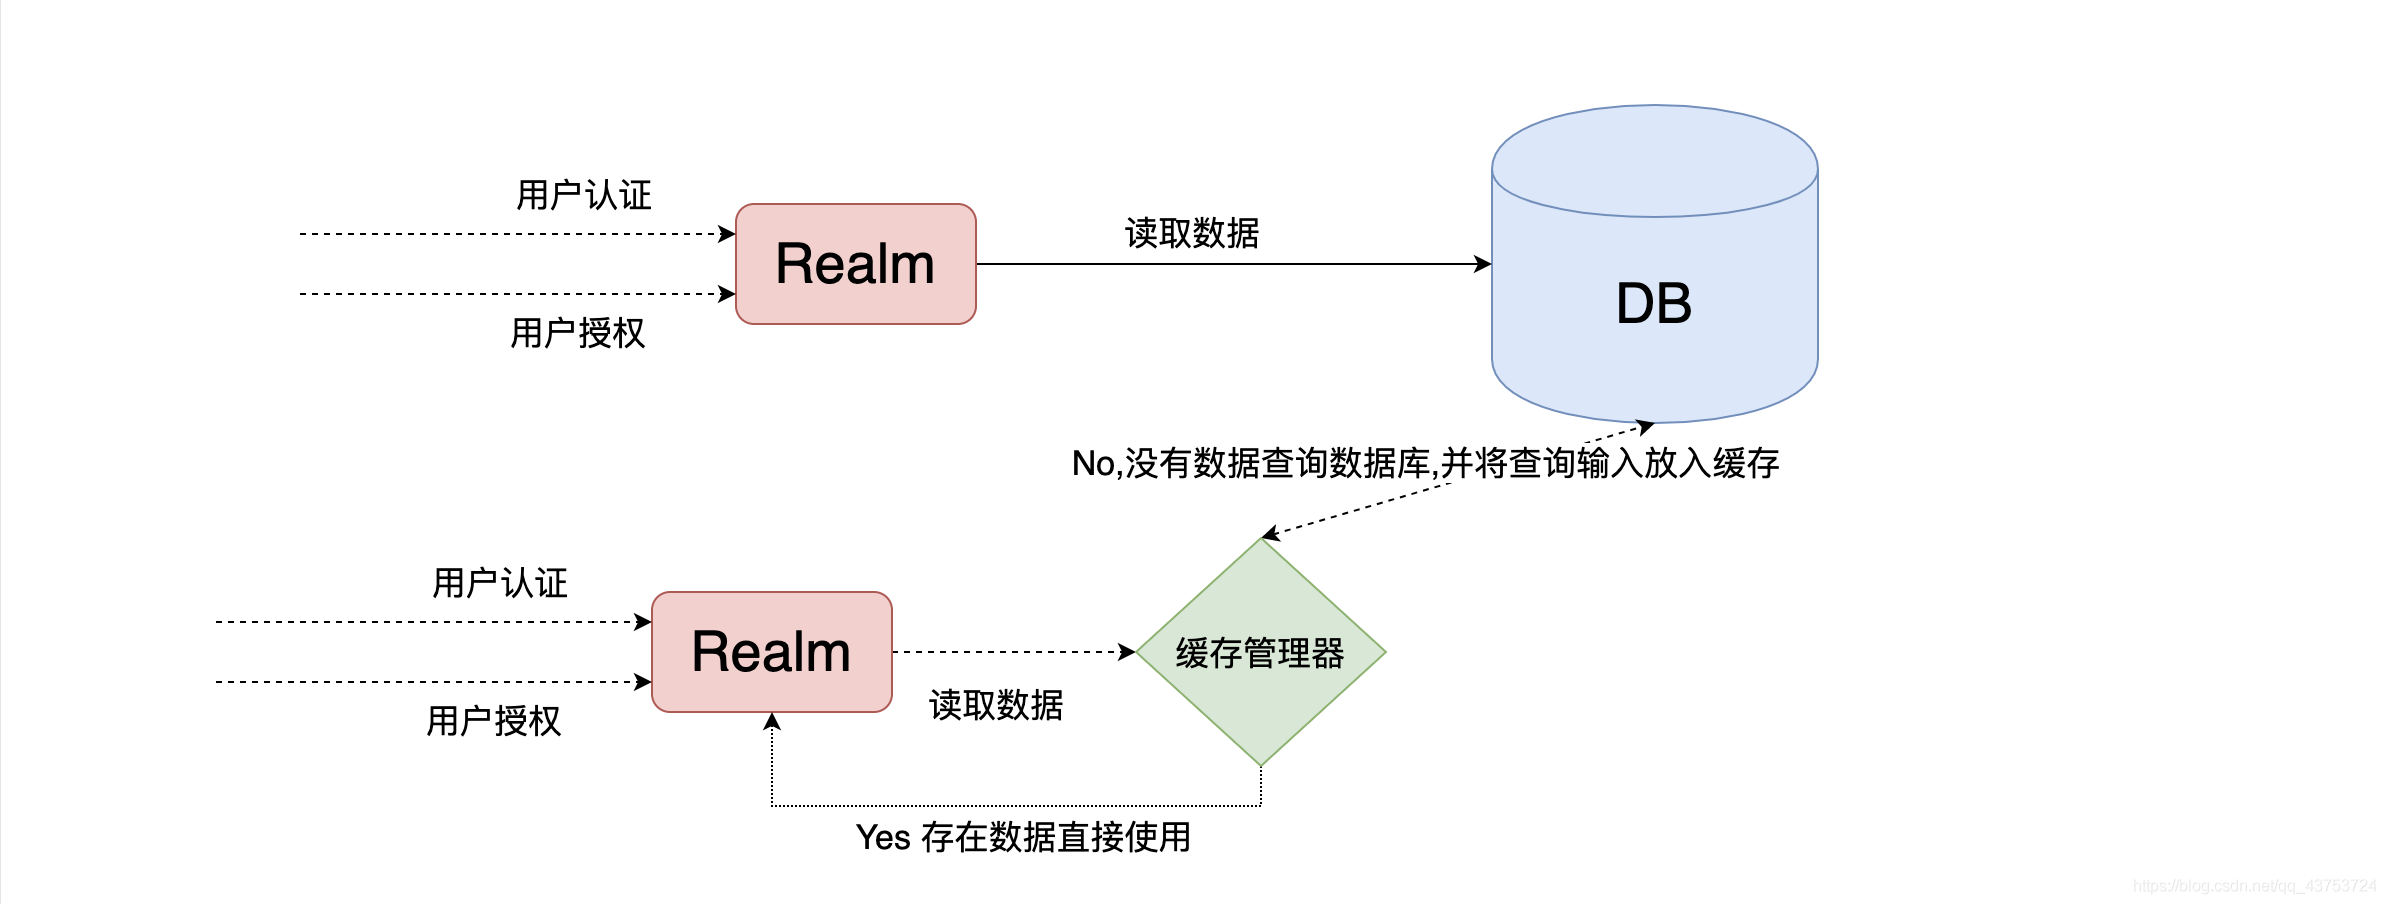
<!--引入shiro和ehcache-->
<dependency>
  <groupId>org.apache.shiro</groupId>
  <artifactId>shiro-ehcache</artifactId>
  <version>1.5.3</version>
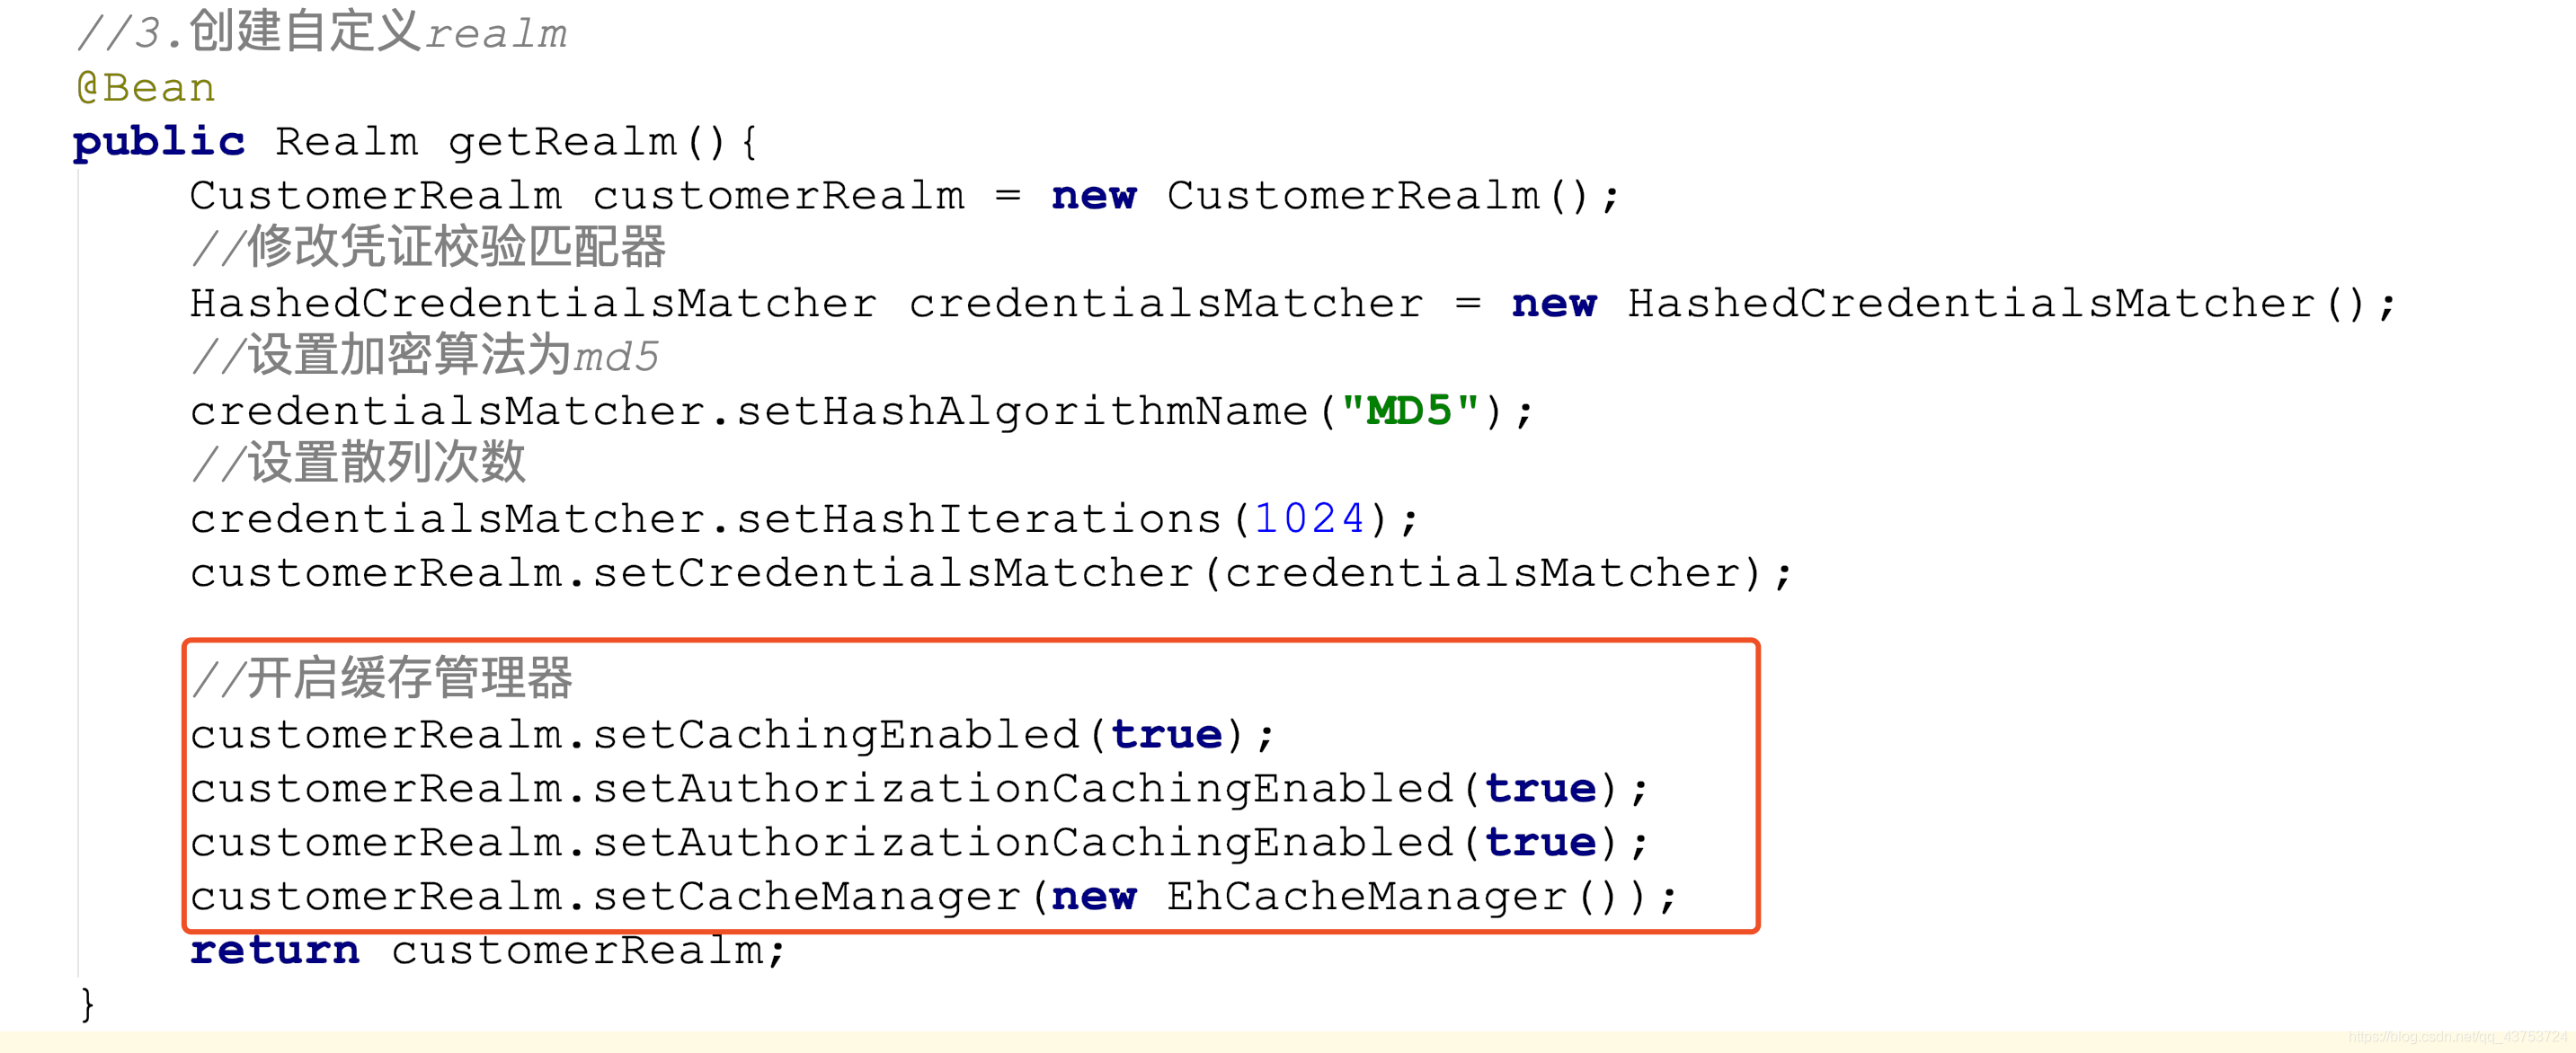
</dependency>//3.创建自定义realm
@Bean
public Realm getRealm(){
CustomerRealm customerRealm = new CustomerRealm();
//修改凭证校验匹配器
HashedCredentialsMatcher credentialsMatcher = new HashedCredentialsMatcher();
//设置加密算法为md5
credentialsMatcher.setHashAlgorithmName("MD5");
//设置散列次数
credentialsMatcher.setHashIterations(1024);
customerRealm.setCredentialsMatcher(credentialsMatcher);
//开启缓存管理器
customerRealm.setCachingEnabled(true);
customerRealm.setAuthorizationCachingEnabled(true);
customerRealm.setAuthorizationCachingEnabled(true);
customerRealm.setCacheManager(new EhCacheManager());
return customerRealm;
}
<!--redis整合springboot-->
<dependency>
  <groupId>org.springframework.boot</groupId>
  <artifactId>spring-boot-starter-data-redis</artifactId>
</dependency>这里我用虚拟机上面的redis
#redis
spring.redis.database=0
spring.redis.host=192.168.159.22
spring.redis.port=6379➜ bin ls
dump.rdb redis-check-aof redis-cli redis-server redis.conf
redis-benchmark redis-check-rdb redis-sentinel redis-trib.rb
➜ bin ./redis-server redis.confpublic class RedisCacheManager implements CacheManager {
@Override
public <K, V> Cache<K, V> getCache(String cacheName) throws CacheException {
System.out.println("缓存名称: "+cacheName);
return new RedisCache<K,V>(cacheName);
}
}public class RedisCache<K,V> implements Cache<K,V> {
private String cacheName;
public RedisCache() {
}
public RedisCache(String cacheName) {
this.cacheName = cacheName;
}
@Override
public V get(K k) throws CacheException {
System.out.println("获取缓存:"+ k);
return (V) getRedisTemplate().opsForHash().get(this.cacheName,k.toString());
}
@Override
public V put(K k, V v) throws CacheException {
System.out.println("设置缓存key: "+k+" value:"+v);
getRedisTemplate().opsForHash().put(this.cacheName,k.toString(),v);
return null;
}
@Override
public V remove(K k) throws CacheException {
return (V) getRedisTemplate().opsForHash().delete(this.cacheName,k.toString());
}
@Override
public v remove(k k) throws CacheException {
return (v) getRedisTemplate().opsForHash().delete(this.cacheName,k.toString());
}
@Override
public void clear() throws CacheException {
getRedisTemplate().delete(this.cacheName);
}
@Override
public int size() {
return getRedisTemplate().opsForHash().size(this.cacheName).intValue();
}
@Override
public Set<k> keys() {
return getRedisTemplate().opsForHash().keys(this.cacheName);
}
@Override
public Collection<v> values() {
return getRedisTemplate().opsForHash().values(this.cacheName);
}
private RedisTemplate getRedisTemplate(){
RedisTemplate redisTemplate = (RedisTemplate) ApplicationContextUtils.getBean("redisTemplate");
redisTemplate.setKeySerializer(new StringRedisSerializer());
redisTemplate.setHashKeySerializer(new StringRedisSerializer());
return redisTemplate;
}
//封装获取redisTemplate
private RedisTemplate getRedisTemplate(){
RedisTemplate redisTemplate = (RedisTemplate) ApplicationContextUtils.getBean("redisTemplate");
redisTemplate.setKeySerializer(new StringRedisSerializer());
redisTemplate.setHashKeySerializer(new StringRedisSerializer());
return redisTemplate;
}
}
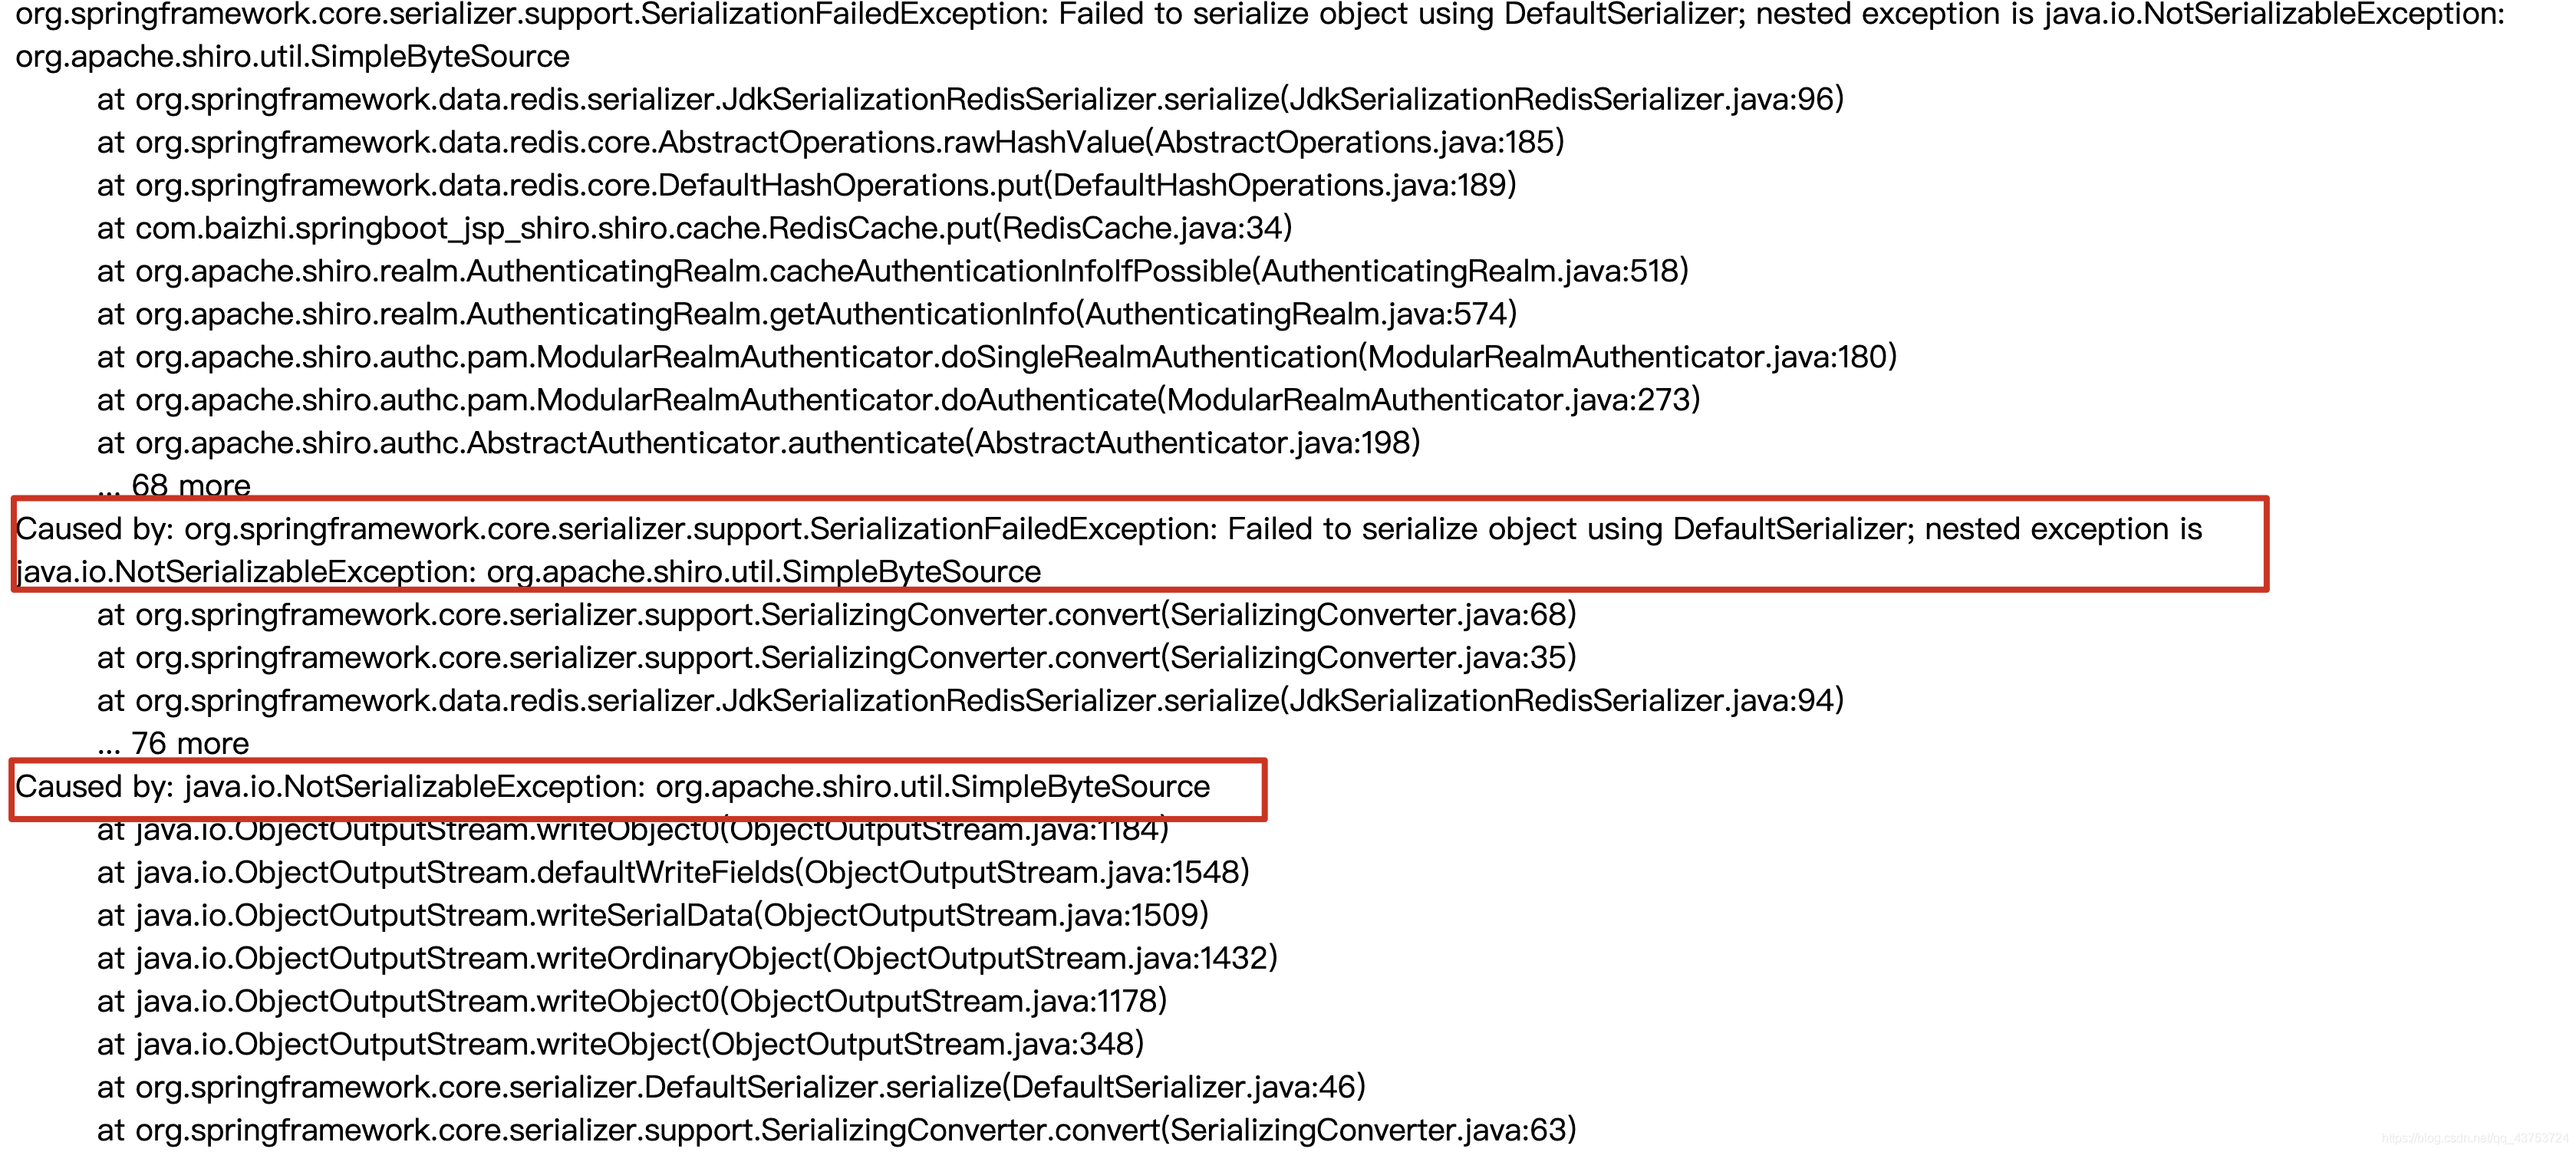
错误解释: 由于shiro中提供的simpleByteSource实现没有实现序列化,所有在认证时出现错误信息
解决方案: 需要自动salt实现序列化
自定义salt实现序列化
//自定义salt实现  实现序列化接口
public class MyByteSource extends SimpleByteSource implements Serializable {
    public MyByteSource(String string) {
        super(string);
    }
}在realm中使用自定义salt
 @Override
protected AuthenticationInfo doGetAuthenticationInfo(AuthenticationToken token) throws AuthenticationException {
  System.out.println("==========================");
  //根据身份信息
  String principal = (String) token.getPrincipal();
  //在工厂中获取service对象
  UserService userService = (UserService) ApplicationContextUtils.getBean("userService");
  User user = userService.findByUserName(principal);
  if(!ObjectUtils.isEmpty(user)){
    return new SimpleAuthenticationInfo(user.getUsername(),user.getPassword(),
                                      new MyByteSource(user.getSalt()),this.getName());
  }
  return null;
}

开发控制器
@RequestMapping("getImage")
public void getImage(HttpSession session, HttpServletResponse response) throws IOException {
  //生成验证码
  String code = VerifyCodeUtils.generateVerifyCode(4);
  //验证码放入session
  session.setAttribute("code",code);
  //验证码存入图片
  ServletOutputStream os = response.getOutputStream();
  response.setContentType("image/png");
  VerifyCodeUtils.outputImage(220,60,os,code);
}放行验证码


修改认证流程
@RequestMapping("login")
    public String login(String username, String password,String code,HttpSession session) {
        //比较验证码
        String codes = (String) session.getAttribute("code");
        try {
            if (codes.equalsIgnoreCase(code)){
                //获取主体对象
                Subject subject = SecurityUtils.getSubject();
                    subject.login(new UsernamePasswordToken(username, password));
                    return "redirect:/index.jsp";
            }else{
                throw new RuntimeException("验证码错误!");
            }
        } catch (UnknownAccountException e) {
            e.printStackTrace();
            System.out.println("用户名错误!");
        } catch (IncorrectCredentialsException e) {
            e.printStackTrace();
            System.out.println("密码错误!");
        }catch (Exception e){
            e.printStackTrace();
            System.out.println(e.getMessage());
        }
        return "redirect:/login.jsp";
}修改salt不能序列化的问题
//自定义salt实现  实现序列化接口
public class MyByteSource implements ByteSource,Serializable {

    private  byte[] bytes;
    private String cachedHex;
    private String cachedBase64;

    //加入无参数构造方法实现序列化和反序列化
    public MyByteSource(){

    }

    public MyByteSource(byte[] bytes) {
        this.bytes = bytes;
    }

    public MyByteSource(char[] chars) {
        this.bytes = CodecSupport.toBytes(chars);
    }

    public MyByteSource(String string) {
        this.bytes = CodecSupport.toBytes(string);
    }

    public MyByteSource(ByteSource source) {
        this.bytes = source.getBytes();
    }

    public MyByteSource(File file) {
        this.bytes = (new MyByteSource.BytesHelper()).getBytes(file);
    }

    public MyByteSource(InputStream stream) {
        this.bytes = (new MyByteSource.BytesHelper()).getBytes(stream);
    }

    public static boolean isCompatible(Object o) {
        return o instanceof byte[] || o instanceof char[] || o instanceof String || o instanceof ByteSource || o instanceof File || o instanceof InputStream;
    }

    public byte[] getBytes() {
        return this.bytes;
    }

    public boolean isEmpty() {
        return this.bytes == null || this.bytes.length == 0;
    }

    public String toHex() {
        if (this.cachedHex == null) {
            this.cachedHex = Hex.encodeToString(this.getBytes());
        }

        return this.cachedHex;
    }

    public String toBase64() {
        if (this.cachedBase64 == null) {
            this.cachedBase64 = Base64.encodeToString(this.getBytes());
        }

        return this.cachedBase64;
    }

    public String toString() {
        return this.toBase64();
    }

    public int hashCode() {
        return this.bytes != null && this.bytes.length != 0 ? Arrays.hashCode(this.bytes) : 0;
    }

    public boolean equals(Object o) {
        if (o == this) {
            return true;
        } else if (o instanceof ByteSource) {
            ByteSource bs = (ByteSource)o;
            return Arrays.equals(this.getBytes(), bs.getBytes());
        } else {
            return false;
        }
    }

    private static final class BytesHelper extends CodecSupport {
        private BytesHelper() {
        }

        public byte[] getBytes(File file) {
            return this.toBytes(file);
        }

        public byte[] getBytes(InputStream stream) {
            return this.toBytes(stream);
        }
    }
}