所属分类:web前端开发

组件是angular的构建单元,在项目中为了保证组件之间的数据能够来回的传递,angular封装了一些能够实现组件之间通信的方法。【相关教程推荐:《angular教程》】
父组件
parent.component.ts
age = 18;
name = '  xiaoming '
parent.component.html
<app-child-1 [age]="age" [name]="name"></app-child-1>
子组件
child1.component.ts
@Input() age!: number;
截听输入属性值的变化
1、使用一个输入属性的 setter,以拦截父组件中值的变化,并采取行动。
child1.component.ts
@Input()
set name(name: string) {
    this._name = name.trim();
}
private _name: string;
2、使用 ngOnChanges()钩子函数来监测输入属性值的变化并做出回应。当需要监视多个、交互式输入属性的时候,本方法比用属性的 setter 更合适。
child1.component.ts
ngOnChanges(changes: SimpleChanges): void {
    console.log(changes);
}
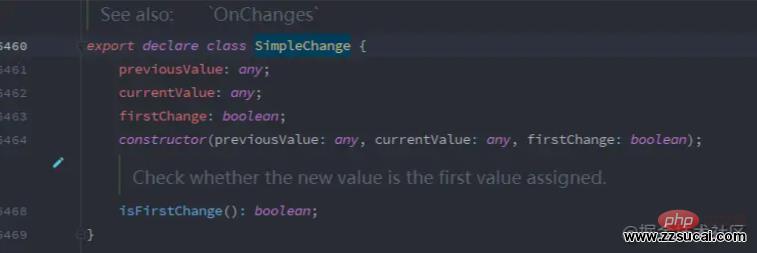
我们可以通过angular官方提供的类型描述文件了解到SimpleChange的相关属性:


子组件暴露一个EventEmitter(带有@Output装饰器)属性,当事件发生时,子组件利用该属性emit事件往父组件发射值。父组件绑定到这个事件属性,并在事件发生时作出回应。
子组件
child1.component.ts
@Output() voted = new EventEmitter<boolean>();
emitValue(): void {
    this.voted.emit(true);
}
child1.component.html
<button (click)="emitValue()">Click</button>
父组件
parent.component.html
<app-child-1 [age]="age" [name]="name" (voted)="getChildParam($event)"></app-child-1>
parent.component.ts
getChildParam(value: boolean): void {
    console.log(value); // true
}子组件
child1.component.ts
address = 'Shanghai';
setAddress(address: string): void {
    this.address = address;
}
父组件
parent.component.html
<app-child-1 [age]="age" [name]="name" (voted)="getChildParam($event)" #child1Component></app-child-1>
<div>{{child1Component.address}}</div>
<button (click)="child1Component.setAddress('Beijing')">Click</button>
局限性:父组件-子组件的连接必须全部在父组件的模板中进行。如果父组件的类需要读取子组件的属性值或调用子组件的方法,就不能使用本地变量方法。
当父组件的类需要读取子组件的属性值或调用子组件的方法,就不能使用本地变量方法;如果有这种需求时,我们可以通过@ViewChild把子组件注入到父组件中;
父组件
parent.component.ts
@ViewChild(Child1Component) private child1Component!: Child1Component;
可以通过child1Component变量访问子组件的属性和方法;
为了实现任意组件之间的通信,我们可以结合Rxjs中的BehaviorSubject对象来创建一个共享服务;BehaviorSubject的使用可以参考这篇博客blog.tcs-y.com/2019/10/08/…
创建dataService.ts
import {BehaviorSubject} from 'rxjs';
import { Injectable} from '@angular/core';
@Injectable(
  {providedIn: 'root'}
)
export class DataService {
  data: BehaviorSubject<number> = new BehaviorSubject<number>(0);
}
在组件1的构造函数中注入服务并设置data
child1.component.ts
constructor(private dataService: DataService) {}
    // 设置data的值
changeData(): void {
    this.dataService.data.next(10);
}
child1.component.html
<button (click)="changeData()">Click</button>
在组件2的构造函数中注入服务并订阅data
child2.component.ts
constructor(private dataService: DataService) {
    this.dataService.data.subscribe(value => {
        console.log(value); // 10
    });
}
更多编程相关知识,请访问:编程入门!!
以上就是浅谈Angular组件之间通信的5种方法的详细内容,更多请关注zzsucai.com其它相关文章!