所属分类:php教程
程序员必备接口测试调试工具:立即使用
Apipost = Postman + Swagger + Mock + Jmeter
Api设计、调试、文档、自动化测试工具
后端、前端、测试,同时在线协作,内容实时同步
【相关推荐:Python3视频教程 】
torch.Tensor 是一种包含单一数据类型元素的多维矩阵,类似于 numpy 的 array。
Tensor 可以使用 torch.tensor() 转换 Python 的 list 或序列数据生成,生成的是dtype 默认是 torch.FloatTensor。
注意
torch.tensor()总是拷贝 data。如果你有一个 Tensor data 并且仅仅想改变它的requires_grad属性,可用requires_grad_()或者detach()来避免拷贝。如果你有一个numpy数组并且想避免拷贝,请使用torch.as_tensor()。
1,指定数据类型的 Tensor 可以通过传递参数 torch.dtype 和/或者 torch.device 到构造函数生成:
注意为了改变已有的 tensor 的 torch.device 和/或者 torch.dtype, 考虑使用
to()方法.
>>> torch.ones([2,3], dtype=torch.float64, device="cuda:0")
tensor([[1., 1., 1.],
        [1., 1., 1.]], device='cuda:0', dtype=torch.float64)
>>> torch.ones([2,3], dtype=torch.float32)
tensor([[1., 1., 1.],
        [1., 1., 1.]])
2,Tensor 的内容可以通过 Python索引或者切片访问以及修改:
>>> matrix = torch.tensor([[2,3,4],[5,6,7]])
>>> print(matrix[1][2])
tensor(7)
>>> matrix[1][2] = 9
>>> print(matrix)
tensor([[2, 3, 4],
        [5, 6, 9]])
3,使用 torch.Tensor.item() 或者 int() 方法从只有一个值的 Tensor中获取 Python Number:
>>> x = torch.tensor([[4.5]])
>>> x
tensor([[4.5000]])
>>> x.item()
4.5
>>> int(x)
4
4,Tensor可以通过参数 requires_grad=True 创建, 这样 torch.autograd 会记录相关的运算实现自动求导:
>>> x = torch.tensor([[1., -1.], [1., 1.]], requires_grad=True)
>>> out = x.pow(2).sum()
>>> out.backward()
>>> x.grad
tensor([[ 2.0000, -2.0000],
 [ 2.0000,  2.0000]])
5,每一个 tensor都有一个相应的 torch.Storage 保存其数据。tensor 类提供了一个多维的、strided 视图, 并定义了数值操作。
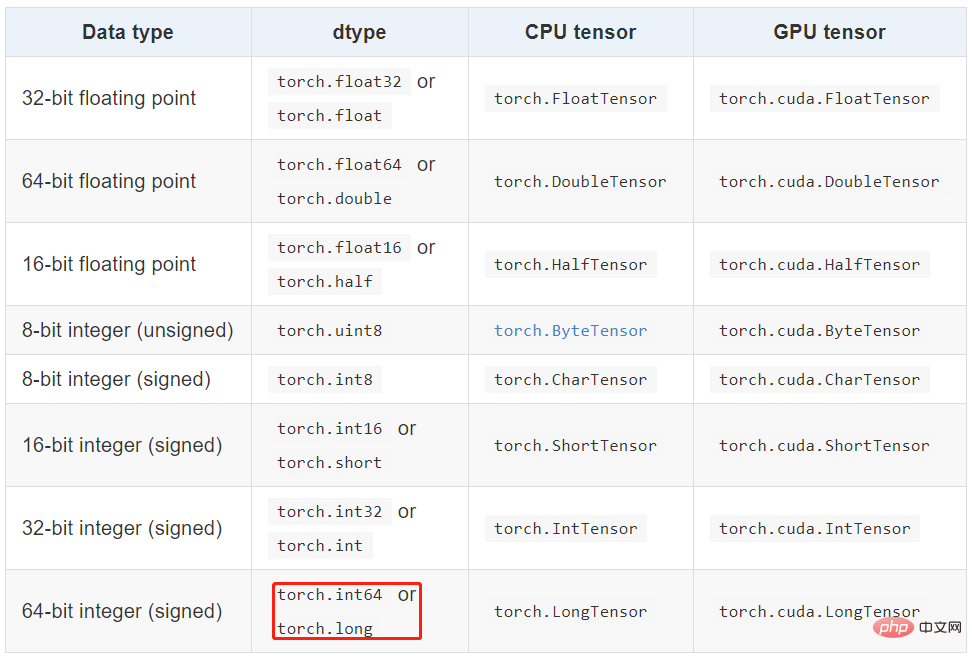
Torch 定义了七种 CPU tensor 类型和八种 GPU tensor 类型:

torch.Tensor 是默认的 tensor 类型(torch.FloatTensor)的简称,即 32 位浮点数数据类型。
Tensor 的属性
Tensor 有很多属性,包括数据类型、Tensor 的维度、Tensor 的尺寸。
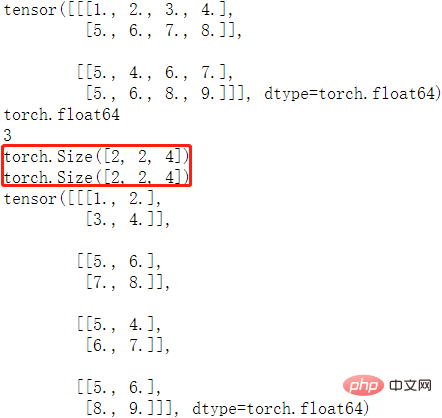
样例代码如下:
matrix = torch.tensor([[[1,2,3,4],[5,6,7,8]],
                       [[5,4,6,7], [5,6,8,9]]], dtype = torch.float64)
print(matrix)               # 打印 tensor
print(matrix.dtype)     # 打印 tensor 数据类型
print(matrix.dim())     # 打印 tensor 维度
print(matrix.size())     # 打印 tensor 尺寸
print(matrix.shape)    # 打印 tensor 尺寸
matrix2 = matrix.view(4, 2, 2) # 改变 tensor 尺寸
print(matrix2)
程序输出结果如下:

两个方法都是用来改变 tensor 的 shape,view() 只适合对满足连续性条件(contiguous)的 tensor 进行操作,而 reshape() 同时还可以对不满足连续性条件的 tensor 进行操作。在满足 tensor 连续性条件(contiguous)时,a.reshape() 返回的结果与a.view() 相同,都不会开辟新内存空间;不满足 contiguous 时, 直接使用 view() 方法会失败,reshape() 依然有用,但是会重新开辟内存空间,不与之前的 tensor 共享内存,即返回的是 ”副本“(等价于先调用 contiguous() 方法再使用 view() 方法)。
更多理解参考这篇文章
1,张量和 numpy 数组。可以用 .numpy() 方法从 Tensor 得到 numpy 数组,也可以用 torch.from_numpy 从 numpy 数组得到Tensor。这两种方法关联的 Tensor 和 numpy 数组是共享数据内存的。可以用张量的 clone方法拷贝张量,中断这种关联。
arr = np.random.rand(4,5)
print(type(arr))
tensor1 = torch.from_numpy(arr)
print(type(tensor1))
arr1 = tensor1.numpy()
print(type(arr1))
"""
<class 'numpy.ndarray'>
<class 'torch.Tensor'>
<class 'numpy.ndarray'>
"""
2,item() 方法和 tolist() 方法可以将张量转换成 Python 数值和数值列表
# item方法和tolist方法可以将张量转换成Python数值和数值列表
scalar = torch.tensor(5)  # 标量
s = scalar.item()
print(s)
print(type(s))

tensor = torch.rand(3,2)  # 矩阵
t = tensor.tolist()
print(t)
print(type(t))
"""
1.0
<class 'float'>
[[0.8211846351623535, 0.20020723342895508], [0.011571824550628662, 0.2906131148338318]]
<class 'list'>
"""
创建 tensor ,可以传入数据或者维度,torch.tensor() 方法只能传入数据,torch.Tensor() 方法既可以传入数据也可以传维度,强烈建议 tensor() 传数据,Tensor() 传维度,否则易搞混。
| 方法名 | 方法功能 | 备注 |
|---|---|---|
torch.rand(*sizes, out=None) → Tensor | 返回一个张量,包含了从区间 [0, 1) 的均匀分布中抽取的一组随机数。张量的形状由参数sizes定义。 | 推荐 |
torch.randn(*sizes, out=None) → Tensor | 返回一个张量,包含了从标准正态分布(均值为0,方差为1,即高斯白噪声)中抽取的一组随机数。张量的形状由参数sizes定义。 | 不推荐 |
torch.normal(means, std, out=None) → Tensor | 返回一个张量,包含了从指定均值 means 和标准差 std 的离散正态分布中抽取的一组随机数。标准差 std 是一个张量,包含每个输出元素相关的正态分布标准差。 | 多种形式,建议看源码 |
torch.rand_like(a) | 根据数据 a 的 shape 来生成随机数据 | 不常用 |
torch.randint(low=0, high, size) | 生成指定范围(low, hight)和 size 的随机整数数据 | 常用 |
torch.full([2, 2], 4) | 生成给定维度,全部数据相等的数据 | 不常用 |
torch.arange(start=0, end, step=1, *, out=None) | 生成指定间隔的数据 | 易用常用 |
torch.ones(*size, *, out=None) | 生成给定 size 且值全为1 的矩阵数据 | 简单 |
zeros()/zeros_like()/eye() | 全 0 的 tensor 和 对角矩阵 | 简单 |
样例代码:
>>> torch.rand([1,1,3,3])
tensor([[[[0.3005, 0.6891, 0.4628],
          [0.4808, 0.8968, 0.5237],
          [0.4417, 0.2479, 0.0175]]]])
>>> torch.normal(2, 3, size=(1, 4))
tensor([[3.6851, 3.2853, 1.8538, 3.5181]])
>>> torch.full([2, 2], 4)
tensor([[4, 4],
        [4, 4]])
>>> torch.arange(0,10,2)
tensor([0, 2, 4, 6, 8])
>>> torch.eye(3,3)
tensor([[1., 0., 0.],
        [0., 1., 0.],
        [0., 0., 1.]])
【相关推荐:Python3视频教程 】
以上就是实例详解Pytorch中的tensor数据结构的详细内容,更多请关注zzsucai.com其它相关文章!
